Alright, my friends, let’s chat. In our miniature world, bases are big deal. Seriously, even a kindergarten-like paint job can look fab with a neat base. And remember, a great paint job on a shabby base is like a tuxedo on a goat – makes zero sense.
Bases are like mini-movie sets for our tiny heroes, telling tales and capturing epic moments. And they amp up special effects like OSL or weathering to a whole new level.
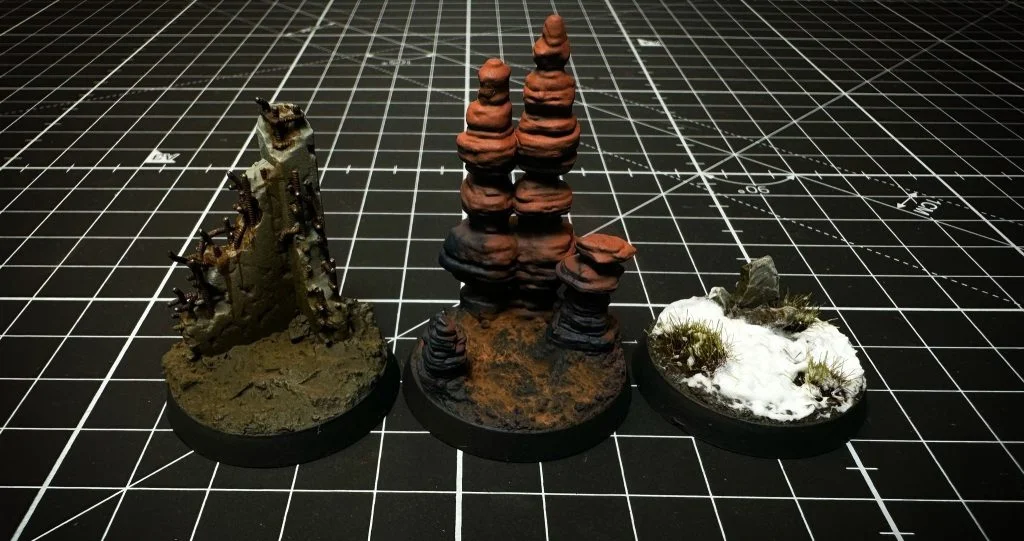
Time for another round of our base series. We’ve got 3 brand-new, top-notch bases to take your miniatures from ‘meh’ to ‘wow’.

Adan
Brush Master
28/07/2023

Catch everyone’s eyes
Download your free painting guide
This guide is like a crash course in painting where you will discover how to judiciously choose and design the most stunning and impactful colour scheme to make your army a real eye-catcher both in the display case and on the gaming table.


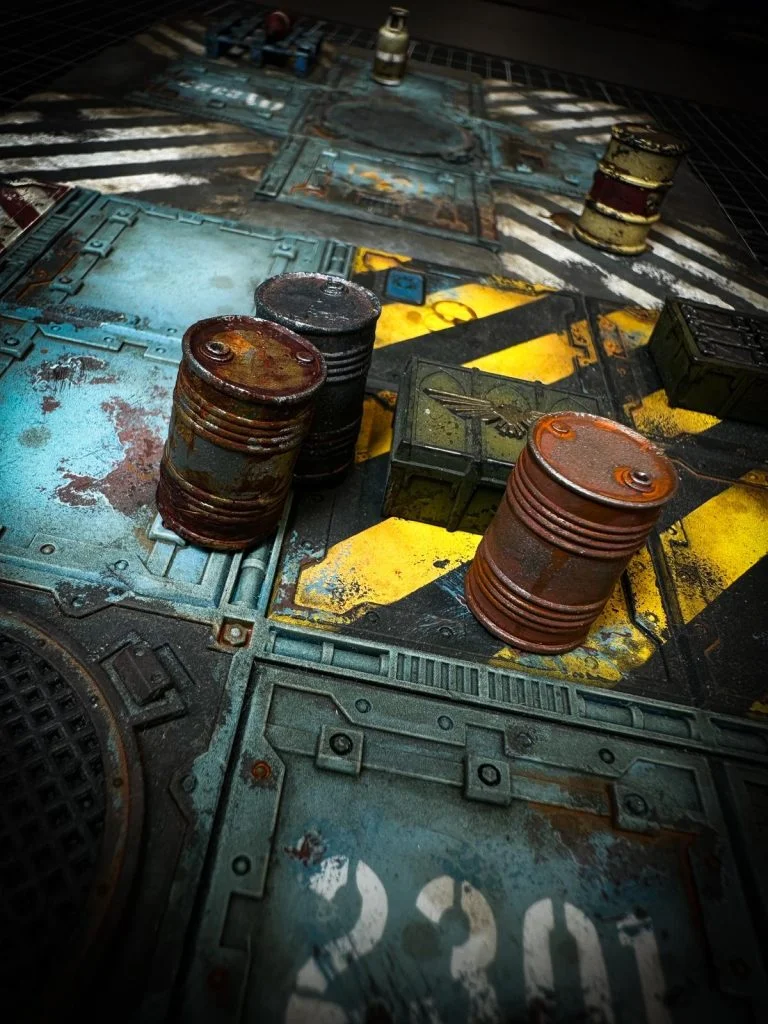
INDUSTRIAL ZONE – SPACE WRECK
- Pick a base, ideally something that screams “industrial” like those Necromunda bases. They’re just right for that metal floor vibe we’re going for.
- Next, it’s priming time. We’ve used AK Interactive’s black primer spray for this, followed by a coat of AK black paint to get things really dark.
- Now, choose a metallic color that you’re into. We went for Vallejo’s ‘exhaust manifold’ from their metal color series. But honestly, don’t sweat it, ’cause this is just our metallic base and it’ll be mostly covered up soon.
Finally, time to rust things up with AK Interactive’s hull red, medium rust, and light rust. Make sure it’s really diluted – we’re talking 60-80% water. Mix the colors up a bit. It’s all good – it just adds to the unique, rusty look we’re chasing.


- Let’s roll up our sleeves and get back to work with some dry brushing. Use AK black (again, we know) but brush most of it off before you start. Brush it all over until you get an effect like the picture shows. It’s a bit of an art, but you’ll get the hang of it.
- Now, let’s rough this baby up a bit. Create dings and scratches with a touch of chipping, using a sponge and AK Interactive’s gun metal color. It’s like adding laugh lines to a face, it adds character.
- Time to add some safety covers, because even in an industrial setting, safety first, right? Pick where you want them to go, glue ’em down, and give them a coat of our trusty AK black.
- On those safety covers, we’re going to get creative. Get your hands steady and start drawing lines with AK Orange brown. It’s a flat, open canvas so it’s perfect for testing your freehand skills. But hey, if you’re not feeling so brave, just use some masking tape. No judgment here.


- Let’s now bring out the sunshine with some highlights on that Orange brown. Start off with AK volcanic yellow. It’s like a little ray of sunshine on our industrial base.
- Now, let’s double down with a second round of highlighting, this time with AK yellow. Your base is starting to glow now, isn’t it?
- Time for some finer details. Let’s add a few small scratches with AK black. Keep it subtle though, we’re not going for a base that’s seen a war zone. Then, let’s give it some depth with an airbrush and Vallejo Smoke, and add tiny spots of dark rust pigment for that just-right touch of weathering.
Finally, once you’ve painted the border in black, you can stand back and admire your amazing base. You’ve got that snazzy black and yellow zebra effect going on, and it looks awesome. You’ve just raised your miniature game to a whole new level. High fives all around!

ROAD
- Kick things off by finding a piece of laminated cork that’s just right for your base and cut it out with care. Now, put that puzzle back together but leave a tiny gap between pieces when you glue them onto the base. What we’re going for here is the look of a war-torn, time-worn asphalt road.
- Next, coat the cork with a thin layer of AK Sandy desert texture. It’s like icing a cake, but less delicious.
- Once that’s done, prime the whole shebang and give it a nice coat of – you guessed it – AK black.
- Now it’s time for the first dry brush. Take AK anthracite and brush it all over that asphalt. Go easy, though. We’re going for a subtle effect.


- Let’s continue with another dry brush. This time, we’re focusing on the edges of the asphalt pieces using AK French blue. It’s like adding a touch of twilight to our worn road.
- Now that the asphalt base is looking good, let’s put some traffic lines on this road. We’re gonna start by sketching the markings with AK Interactive Orange Brown. They’re just guidelines, so no need for perfection yet.
- Next, give those traffic lines a first light of AK volcanic yellow. It’s like the first rays of dawn breaking on your base.
- Lastly, hit those traffic lines with a second light of AK Yellow. Just like that, your road markings are shining bright. They’re almost real enough to follow!


- We’re almost done here. Let’s add a touch of greenery using the vegetation from Greengrass games. Apply it with a light hand, we don’t want a jungle, just a hint of life.
- And for the final touch, we’re going to dust some AK dark earth pigment into the cracks and grooves, to mimic the look of earth between the asphalt. Then, a smidge of black pigment on the asphalt to create the effect of soot.
Once you’ve given the edge a coat of black paint, your road base is ready for action. It’s perfect for recreating those high-speed, adrenaline-pumping battles. Gear up, it’s time to play!

SWAMP
- To start this one off, let’s add some texture to our base. We’re using AK Interactive’s “Neutral Texture for Rough Terrain”. Be sure to leave a few hollows and puddles without texture – we’ll turn those into the typical muddy, swampy bits later.
- Once that’s dry, we go back to our tried and true routine: prime the base and give it a good old coat of AK black.
- Now, let’s make it look more earthy by covering the base with AK Chocolate Chipping. It’s all about the details here.
- To finish off this stage, emphasize the texture of the ground with a dry brush of AK Green Ochre. Your base is now starting to look like it’s straight out of a swamp. Good job!


- Now, let’s up the game on that ground. Apply AK Interactive’s dark earth and faded green pigments to add more depth and color.
- To set those pigments and give the ground more shade, we’re gonna hit it with some Vallejo Smoke, applied with an airbrush. It’s like adding a little mist to our swamp.
- Let’s get to work on those puddles now. Paint their bottoms with AK Olive Green to replicate the sediment that typically gathers in shallow, marshy areas.
- To finish this off, add some vegetation of your choice to the base. Try to stick with dark tones to keep the swamp vibe going. We’re going for creepy, not tropical here!


- Alright, it’s the moment of truth! Apply AK puddles in the grooves of the ground, and gently spread it around with a brush to create that wet, waterlogged swamp look. It’s like adding water to your own tiny ecosystem.
- As it dries, you can move the product around a bit with the brush to mimic the movement of water. It’s a small detail, but it’ll make your base look that much more realistic.
Once you’ve painted the border with our trusty AK black, your swamp base is ready for action. It’s versatile too – it could be a polluted world, alien terrain, or the toxic areas of a nuclear power plant. Just tweak the colors in the puddles to match your theme. Talk about bang for your buck!
And just like that, we’re done for today! Your mini warriors are standing tall on their epic bases.
Before we sign off, remember that the base isn’t just a stage – it’s part of the story. If you can get your miniatures to interact with the elements on the base, each one will be like a little diorama. And when you’ve got an army of these, your opponent will be left wide-eyed and gasping.
Till next time, happy basing!
Download the behind scenes of a project
Want to know how we work? We have documented a client’s project from start to finish so you know what it will be like to work with us.