Bases are of paramount importance in the final result of our miniatures. Even the best paint job can be tarnished by a mediocre base. Likewise, a basic painting can gain a lot of strength with the right base.
Bases give context to our works, tell their stories and represent exact moments of their adventures.
They also give meaning to many of the effects we recreate on our figures, such as OSL or the different types of wheatering.
Today we are going to show you how to create in a simple way, but with an impeccable result, 3 of the most demanded bases by our customers.
We will use some of the fantastic bits from the brand Epic Basing, elements that will undoubtedly revolutionize our bases.

Adan
Brush Master
01/07/2023

Catch everyone’s eyes
Download your free painting guide
This guide is like a crash course in painting where you will discover how to judiciously choose and design the most stunning and impactful colour scheme to make your army a real eye-catcher both in the display case and on the gaming table.


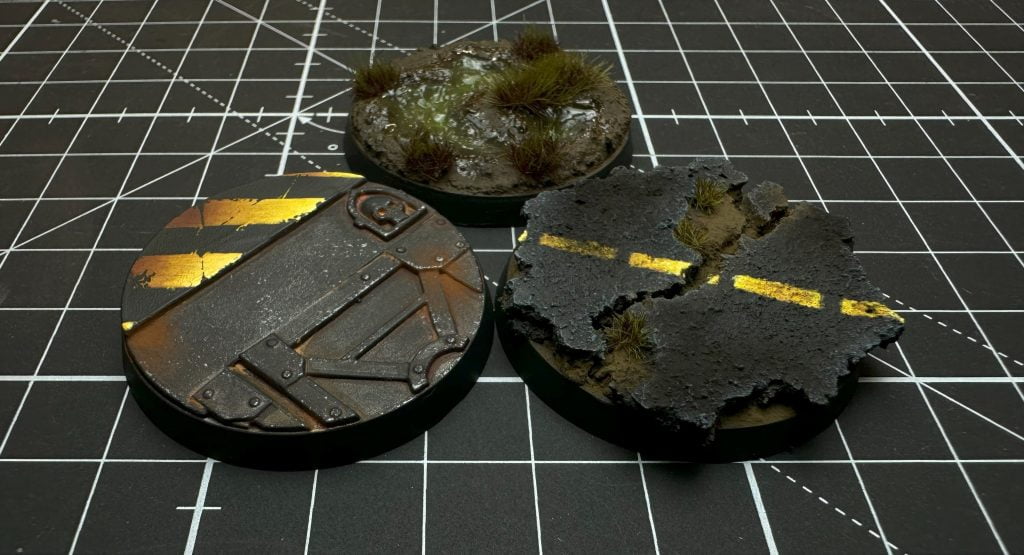
Warhammer basing tutorial: Red Desert
- We start by presenting our desert rock bits on the base and gluing them with Cyanocrystal. We will look for a configuration that highlights the volumes of our miniature and at the same time frames it without hiding it.
- We will apply earth texture, in this case Neutral Texture for Rough Terrain by AK interactive. We distribute it homogeneously and wait for it to dry.
- Once dry, we check that the result is adequate. We can always add texture if we need it.
Let’s print the base in black.

Next, we start painting our base, with the help of an airbrush.
- We will apply an even coat of AK dark prussian blue to the whole base.
Then we will give a first light at a vertical angle of 45 degrees with AK Hull red. - Finally a last light completely vertical with AK medium red. We must rely on the excellent volumes of the miniature during these steps, so we will get a very interesting texture.
- We will add small messy patches of powder pigments, AK dark and light rust to the ground. This gives a dusty look that respects the scale of what we are creating.

- To define the volume of the ground texture, we will give a side shadow with an airbrush at ground level. We will use Liquitex Ptalocyanine blue green shade ink.
- Finally, we close the base by painting the border in black.
Warhammer basing tutorial: Urban Ruins
- Again we present the bits and adhere them to the base.
- Apply the same texture as in the previous Peana and wait for it to dry (3).
- Priming in black.

- Next we will paint the ruined wall. We will apply a first general coat with AK extra dark green. It should be noted that in none of these bases should we worry about not painting the ground as the random colour shades together with the final powder pigments will result in a very realistic illumination.
- We will give a first light at a vertical angle of 45 degrees with AK grey green. We will try to respect the areas close to corners and nooks, to create a shadow effect.
- We now apply a dry brush of AK grey grey to the upper areas of the wall and the earth texture.
- We apply small patches of AK burnt umber pigment randomly on the ground, lightly staining the wall to recreate the deposited dust
In turn we will treat the rebar with Dirty down rust as we saw in the blog post on rust. Probably the quickest method to achieve an attractive result in a very short time.

- We highlighted the volume of the texture and the shadows of the wall with Vallejo Smoke.
- Finally we closed the base with a small metallic chipping on the rust and painting the edge of the base in black.


Warhammer basing tutorial: Snowy Terrain
1. Once again we present the bits and adhere them to the base.
2. Apply the same texture as in the previous base and wait for it to dry (3).
3. Priming in black.

1. We paint the rocks following exactly the same process as with the urban base wall (2 and 3) (we will also use the same colours). In addition with AK chocolate (chipping) we will paint the earth texture in a disorderly way.
2. We apply unordered zones of AK Burnt umber pigment to the earth texture.

1 & 2. We highlight the volumes of peat and rocks with Vallejo Smoke at ground level.
3. We apply vegetation, looking for muted and dark colours but preserving the greenish tone. In this way the contrast with the snow will be optimal.
4. We apply the snow effect. First we cover 80% of the ground with AK Snow, blurring the product in the areas close to the vegetation and the rocks, avoiding of course to cover these.
Secondly we spread some AK Snow Sprinkles on top of the previous product to simulate the shiny, freshly fallen snow. We will also give small touches on the grass to recreate the frozen moisture on the leaves. These are all small details that add a lot visually.
5. Let the snow dry and finish off the base by painting the edge black.
And that’s it for today! Your troops are already deployed on their immersive bases!
It is worth mentioning the importance of the base in how it interacts with the miniature, if we manage to harmonize the action of the character with the elements of the base, each of our units will represent a small diorama and as a consequence the overall of our army will leave more than one opponent breathless.
Now you know what to do, work on your bases and enjoy this wonderful hobby!
Download the behind scenes of a project
Want to know how we work? We have documented a client’s project from start to finish so you know what it will be like to work with us.